FPRF FilterUpdated 2 days ago
Product Name: FPRF Filter Product Description: Fuel Pressure Regulator Filter 6/8/10 Product Number: TS-0404-15XX |
IMPORTANT NOTES ON YOUR FUEL PRESSURE REGULATOR
- Do NOT remove or adjust the collar.
- Turbosmart accepts no responsibility whatsoever for incorrect installation of this product which is potentially hazardous and can cause serious engine damage or personal injury. Ensure there are no leaks in your fuel system after installation and you have checked fuel suitability.
- Use only high-quality fittings ensuring maximum sealing reliability. Optional Turbosmart fitting kit available.
- Ensure that all plumbing is appropriately secured, is the correct size and chemical rating for your application when fitting your FPRF.
- Ensure to relieve fuel pressure before removing OEM Fuel Pressure Regulator
- Your fuel pressure regulator should be mounted at least 100mm from any significant heat source.
- The internal filter should be replaced at regular fuel filter change intervals. Failure to clear filter of particulates may restrict fuel flow change the regulated pressure
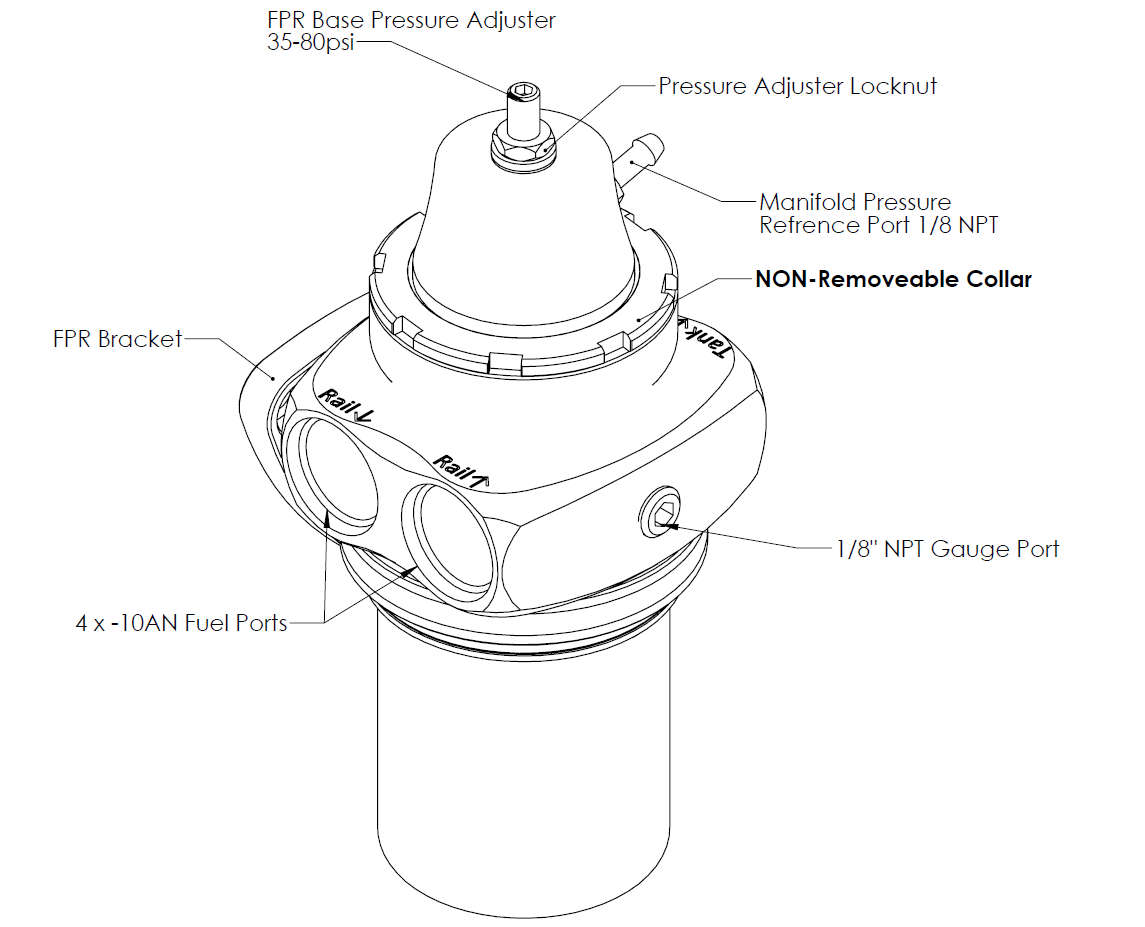
- Gauge port is 1/8” NPT.
- All FPR's can be mounted in any direction.
RECOMMENDATIONS
- Turbosmart recommends that your fuel pressure regulator (FPR) is fitted by an appropriately qualified technician
- Turbosmart recommends that the engine Air-Fuel ratio checked once fuel pressure is set.
- Optional Turbosmart Fuel Filter Kits: TS-0402-3101
HOW TO INSTALL YOUR FUEL PRESSURE REGULATOR
TOOLS REQUIRED
Non-marking spanners to tighten fittings.
Allen Key Set
KIT CONTENTS
Please check that the following items have been provided in your FPRF kit.
Quantity | Description | Use |
1 | Turbosmart FPRF | Main unit |
3 | M6 Mounting Screws | Secures the mounting bracket to panel in car |
1 | Mounting Bracket | Mounting bracket used for remote mounting the FPRF |
1 | Turbosmart Sticker | Turbosmart sticker |
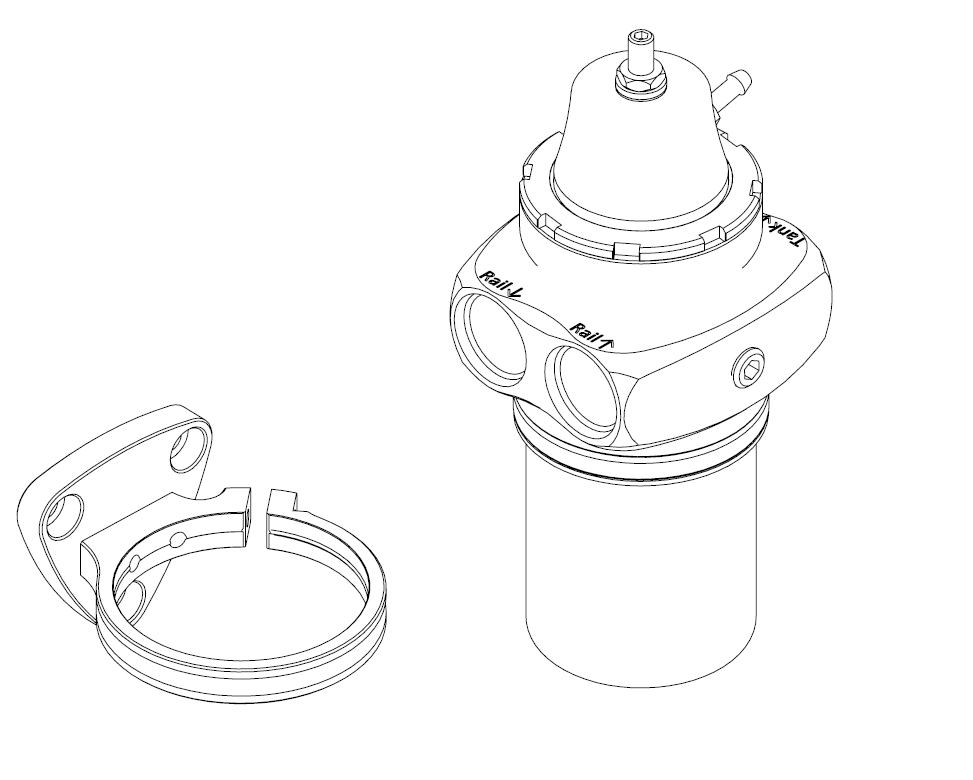
FPRF Filter OVERVIEW
FITTING YOUR FPRF
Locate fuel pressure feed line, base pressure and determine mounting location
This line is usually found by identifying your injectors, the fuel rail the injectors are mounted to and then the line that is feeding the fuel rail. Turbosmart recommends determining your current base fuel pressure with your existing regulator to identify a reference for the base pressure you set the new regulator to. This can be done with any reputable pressure gauge at idle and with the vacuum hose disconnected from the regulator. Take time to determine where you wish to mount the FPRF in the engine bay.
CAUTION!
Do not place the FPRF near a significant heat source as this may lead to severe engine fires.
CAUTION!
Ensure to relieve fuel pressure before removing OEM Fuel Pressure Regulator
Prepare FPRF for installation
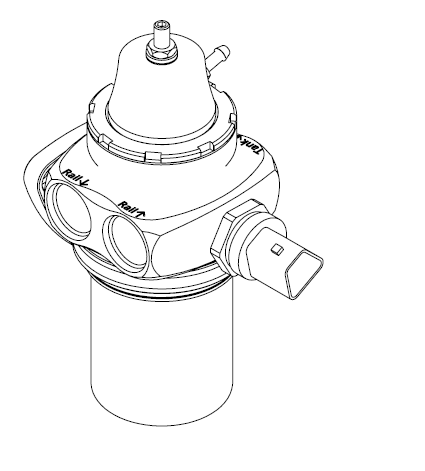
Prior to mounting the FPRF, install fittings into FPRF with high quality AN ORB fittings ensuring the O-Ring is present. The FPRF Filtered Regulator must be plumbed up using the logic supplied on the Regulator. It's graphically represented below.
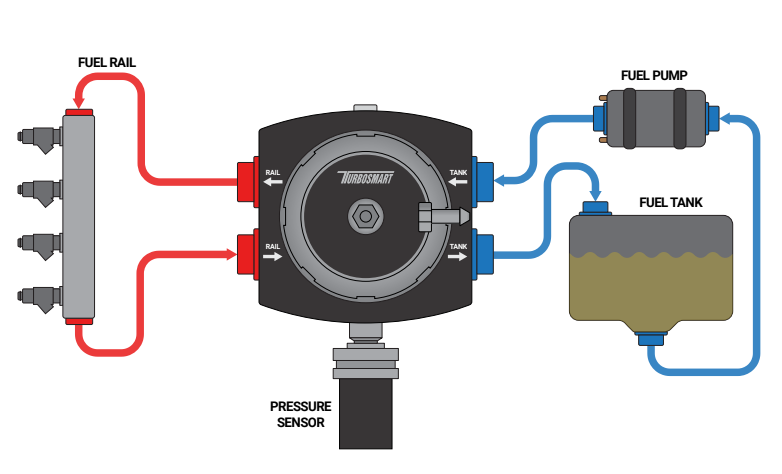
| Stage | Translation | Description | Pressure | Filtered | Fitting Size |
| 1 | Tank ↑ | Feed From Pump | Yes | No | -10 ORB |
| 2 | Rail ↓ | Rail In | Yes | Between Tank ↑ and Rail Down ↓ | -10 ORB |
| 3 | Rail ↑ | Rail Out | Yes | -10 ORB | |
| 4 | Tank ↓ | Return to Tank | No | -10 ORB |
CAUTION!
Flare fittings CANNOT be used internally on the FPRF. They must be ORB internally.
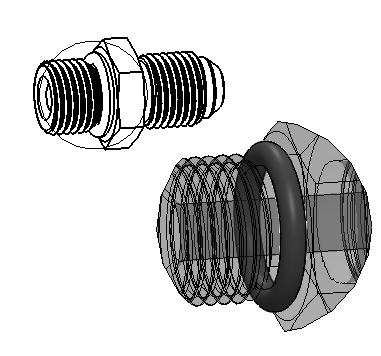
CAUTION!
Ensure correct installation of fittings to prevent high pressure and temperature fuel leaks which can lead to extremely dangerous fires. See across for example of ORB fitting – note the O-ring.
Fit Gauge or Sensor Port (OPTIONAL) or Blank (NOT Optional)
Fitting a gauge or sensor is optional, however the blanks must be used in one or two of the ports. Prior to mounting the FPRF, install 1/8” NPT gauge or sensor. Unscrew existing 1/8” NPT blank anti-clockwise with 3/16” hex key. Apply thread lubricant and screw in clockwise until finger tight, then tighten further 1-2 turns for seal. Turbosmart gauge kit optional – TS-0402-2023.
Note: That there are two options for the gauge port. The unused sensor port should be blocked. Both measure the same pressure, the preference on which port should be whatever benefits the mounting of the sensor.
Mounting your FPRF
With all fittings installed onto the FPRF, the FPRF can now be mounted. The mounting bracket is held on with 3x M6 Allen key screws. A 4mm Allen key is required to secure the regulator to the clamp 5N/mm is required to mount the regulator to the bracket. The mounting bracket is now successfully installed, and you can now mount your FPRF in your specified location. Proceed to connect your fuel lines. ORB fittings should be torqued to 5N/mm and the Fitler cup to 20N/mm

Start engine and check for leaks
Congratulations, your FPRF is installed and ready for use. Double check all fittings, lines and mountings then proceed to activate fuel pumps and check for leaks.
CAUTION!
Engine may run rough with incorrect base fuel pressure.
CAUTION!
If fuel leaks are present – switch off engine immediately and rectify leaks.
CAUTION!
An incorrect setting of fuel pressure may cause your engine to run lean with the potential for detonation. Turbosmart recommends air-fuel ratios are checked immediately after base pressure adjustments.
ADJUSTING YOUR FPRF
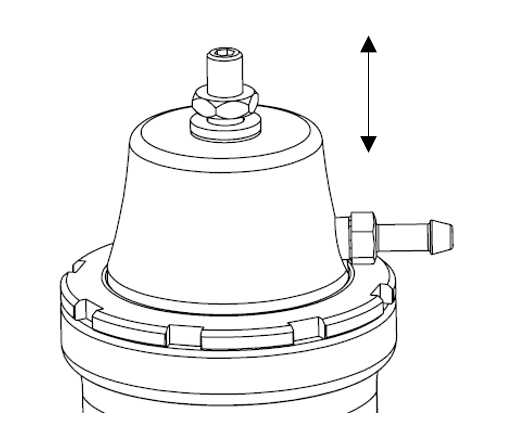
Remove signal reference hose and loosen 10mm locking nut
Remove vacuum/pressure signal reference hose from nipple and loosen 10mm locking nut on top of FPR anti-clockwise to allow for free movement of the adjuster screw.
Adjust base pressure
Ensure battery voltage is sufficient and idle engine. Observe the base pressure on the gauge or your data logging device, turn the adjuster with a 3mm hex tool clockwise to increase fuel pressure and anti-clockwise to decrease fuel pressure.
CAUTION!
Avoid screwing adjuster in forcefully as this will not allow for the device to regulate fuel pressure and can cause damage to your fuel pumps
Tighten 10mm locking nut and reconnect signal reference hose
Once base pressure has been successfully set, reconnect the signal reference hose and tighten the 10mm locking nut preventing the adjuster screw from self-adjusting. Your FPRF has now been adjusted.

Servicing your FPRF
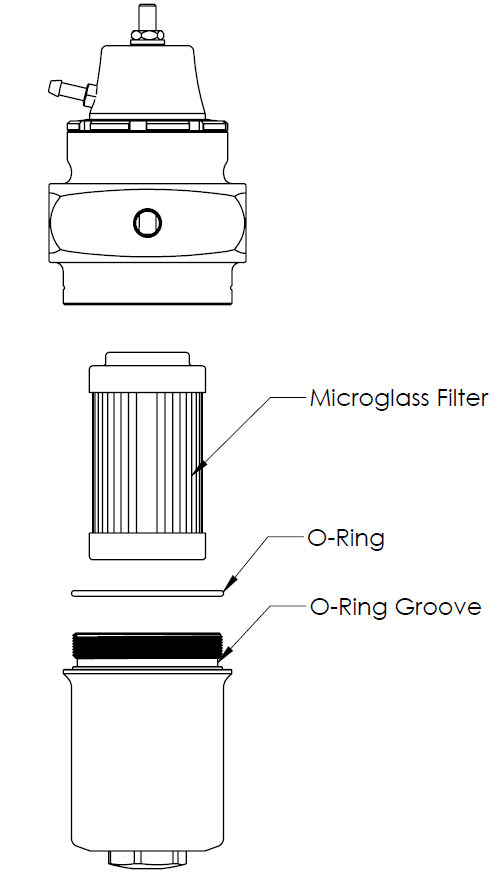
The FPRF comes with a microglass filter to remove particles flowing to the engine, we'd recommend that the fuel filter be inspected regularly in particularly abnormal environments. However replacing every 10,000km or every 6,000 miles is recommended. When refitting filter cup a fuel safe silicon grease should be used on the O-ring to ensure smooth operation and exceptional sealing. Inspection of o-ring is recommended for splits or tears.
To remove the filter cup, a 1 inch spanner or -10 AN Spanner is required. Torque to 20N/m (14ft/lbs).
TROUBLE SHOOTING
- FPRF Leaking – Check fittings are tight and O-Rings are present or not damaged.
- FPRF regulating low pressure – Wind in adjustment screw, if that is insufficient, ensure no blockage. The Regulator can only regulate with a pressure supplied higher than desired.
- FPRF regulating above 100/130psi (690/896kPa) – Ensure fuel return line is not restricted causing a pressure build up for the regulator.
- FPRF failing to regulate, possible fuel line blockage.
- FPRF not holding base pressure – Check for blockages, leaks in the system and that fuel pumps are active.
- Failing the above, submit a technical request to [email protected] with information of your engine, fuel type and photos of installation